Creating a free blog with Hugo and Cloudflare Pages
Table of Contents
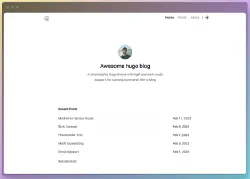
I rebuilt this blog with Hugo and it’s hosted on Cloudflare Pages with GitHub integration. In this guide I’ll go through the steps required to create a blog like this. This is a nice way to create a modern customizable blog that is completely free to host 😄
Creating a local Hugo project and adding it to GitHub
First install Hugo and Git on your computer. On Windows it can be done with WinGet:
winget install --id Git.Git -e --source winget
winget install Hugo.Hugo.Extended
Next create a new Hugo site and initialize a Git repo for it. A GitHub account is needed at this point.
# First set your Git user settings
git config --global user.name "My name"
git config --global user.email "[email protected]"

hugo new site myblog-hugo
cd myblog-hugo
git init
git add .
git commit -m "Initial commit"
git branch -M main
Go to GitHub and create a new repo for your Hugo project. Copy its HTTPS URL and link it to the local folder:
git remote add origin https://github.com/Myname/myblog-hugo.git
I recommend adding the following folders to a .gitignore file so that the public output files that Hugo generates don’t end up in the repo:
# .gitignore
/public
/resources/_gen
Then you can push the code to the new repo. Many of the subfolders won’t actually be added to the repo yet because they’re empty at this point.
git push -u origin main
Setting up the theme
This blog uses the Hugo Blog Awesome theme which is a minimal and modern theme. If you want to properly customize it then it’s a good idea to fork it. If you add it as a Git submodule you can still get updates for it from the original repo. So fork it first here and add your own forked theme repo as a submodule:
git submodule add https://github.com/Myname/hugo-blog-awesome.git themes/hugo-blog-awesome
Next you should copy the provided example configuration file /themes/hugo-blog-awesome/exampleSite/hugo.toml to the root folder of your new site. And push the new submodule to the repo.
git add .
git commit -m "Added the Hugo Blog Awesome theme as a submodule"
git push -u origin main
You can configure the general settings of your Hugo site from this hugo.toml file. It’s nicely documented and the repo has more info. You should at least set the theme from this file. If you’re not going to create content with multiple languages then you can remove the language subfolder ("/en") from the contentDir setting.
theme = "hugo-blog-awesome"
# Set this under [Languages.en-gb]
contentDir = "content"
When you’ve changed the settings to your liking you can commit and push the changes of the file to your repo.
Creating a new post
A test post is needed to see how it looks on the new blog. It can be created manually or with this command:
hugo new content content/posts/hello-world.md
The content of the post is Markdown and its metadata is customized with Hugo’s front matter. Here’s an example of the settings I use most often:
---
title: Hello world!
date: 2025-03-14
draft: true
toc: false
tags:
  - general
---
This is a test post. Hello world!
The Markdown files get processed with the command hugo. Add them to your repo like this:
git add content
git commit -m "Added new post"
git push origin main
You can preview the site locally with Hugo’s built-in server. It’s also good for previewing draft posts. The address is http://localhost:1313
hugo server --buildDrafts
A simple way to add images to posts is to save them in the folder /static/images/ and add them to a post like this: . A more versatile way is to save them in /assets/images/ and use shortcode templates in posts to resize them etc.
Setting up Cloudflare Pages
Go to your Cloudflare dashboard and navigate to Workers & Pages -> Create -> Pages -> Connect to Git.
Connect to your GitHub account and point Cloudflare to the repo of your Hugo blog. Then set the following configuration options:
- Project name: The name you want for the project
- Production branch:
main - Framework preset:
Hugo - Build command:
hugo - Build directory:
public
Create the Pages app and pretty soon you should have a functioning blog site located at https://myblog-hugo.pages.dev.
Publishing a post to your Cloudflare hosted blog
Cloudflare monitors your Hugo repo and rebuilds it whenever it detects changes. The new post appears on the blog when you push it to your repo and its metadata contains draft: false
Updating Cloudflare’s Hugo version
By default the version of Hugo that Cloudflare uses is a bit older. This can create problems if you try to customize templates etc and have a different version of Hugo locally and in Cloudflare. It’s a good idea to configure Cloudflare to use a latest version of Hugo (releases).
In Cloudflare go to your Pages app and navigate to Settings -> Environment variables. Add the following variable:
HUGO_VERSION:0.145.0
Setting a custom domain
A custom domain is generally better than a *.pages.dev address. You can configure it under Custom domains in your Pages app. Also do the same for the www subdomain.
Customizing the theme
The primary SASS file for customizing the theme is /themes/hugo-blog-awesome/assets/sass/_custom.scss but you can also customize the other SASS files in the folder.
If you want to customize the contents of the theme or certain pages then you need edit or create partial templates located at /themes/hugo-blog-awesome/layouts/partials. I mainly customized the files header.html and bio.html that creates the bio elements on the front page.
Updating your theme on Cloudflare
Cloudflare only monitors for changes in your Hugo repo and not the theme repo that is configured as a submodule. To get your theme to update on Cloudflare you need to first commit the changes to the theme repo and then to the Hugo repo.
# For the theme repo
cd themes/hugo-blog-awesome
git add .
git commit -m "Changed style settings for blog posts"
git push origin main

# For the Hugo repo (and Cloudflare build process)
cd ../..
git add themes/hugo-blog-awesome
git commit -m "Updated the theme"
git push origin main
Conclusion
That’s quite a few steps but by now you should have a Hugo blog site with a fully customizable theme.